The Four Seals on Your Garage Door (and What Each One Does)
Most homeowners think "weatherstripping" means one strip of rubber, but a typical Sacramento garage door actually relies on four distinct seals working together. Knowing which one has failed is the first step to fixing the right problem instead of throwing money at the whole door.
Each seal sits at a different point of contact, faces different wear, and uses a different profile. The bottom seal takes the most abuse because it compresses against the concrete on every single cycle and bakes in direct sun and reflected heat off the driveway. The perimeter seals do quieter work but are just as important for keeping the conditioned air, dust, and the Valley's seasonal critters where they belong.
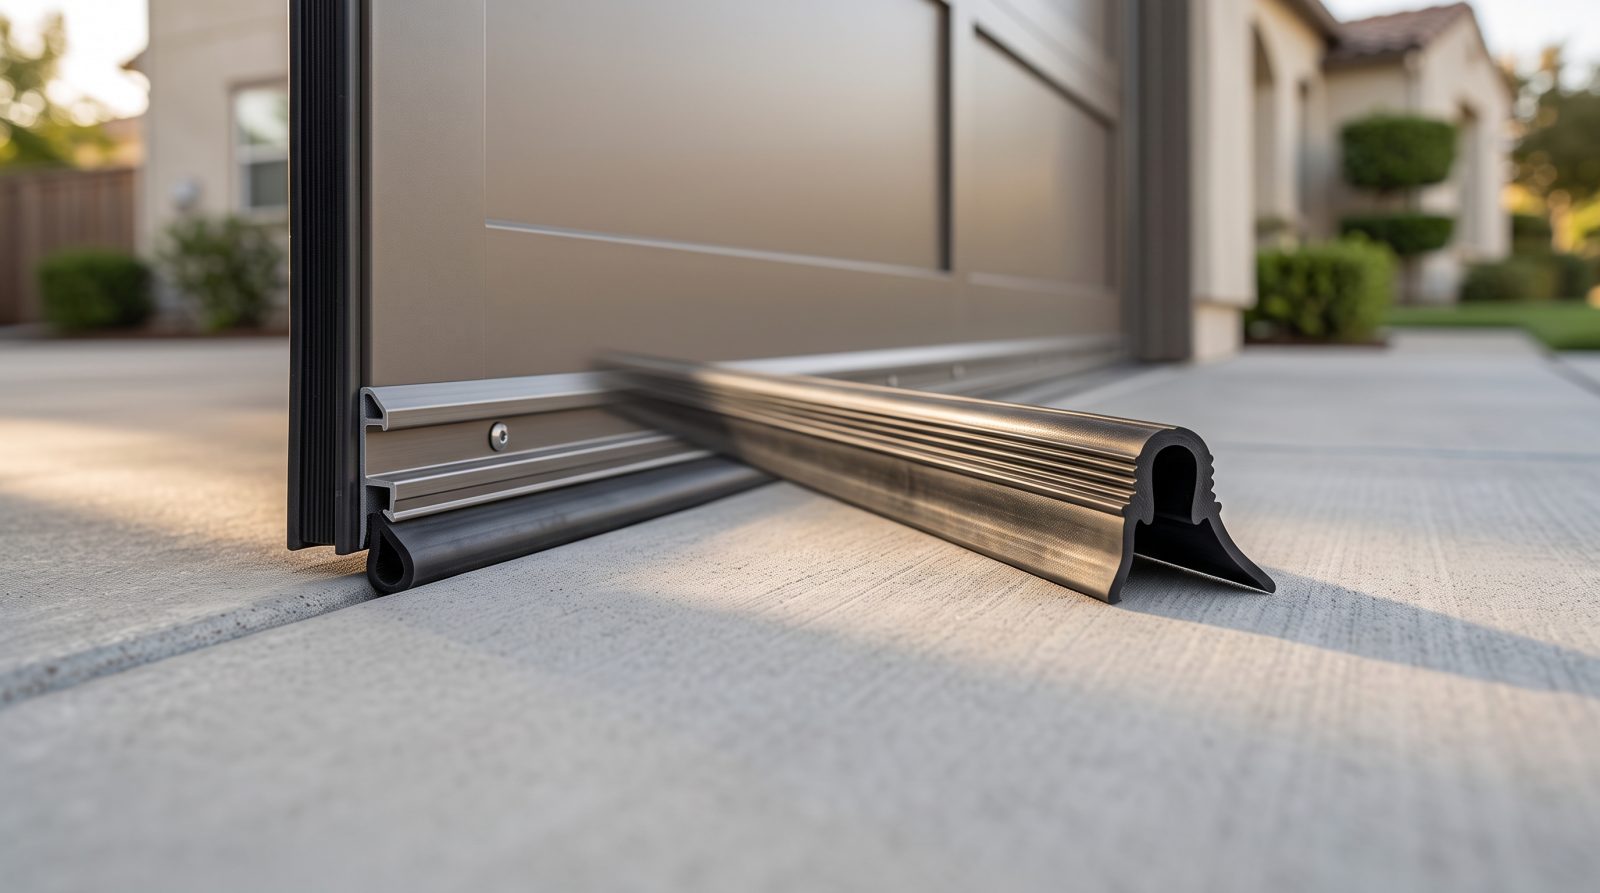
- Bottom seal (astragal): The U-, T-, or bead-shaped rubber or vinyl strip that runs along the bottom of the door and presses against the slab. It's the seal that fails most often and the one most homeowners notice first.
- Bottom retainer/track: On steel and aluminum doors, the bottom seal slides into an aluminum retainer channel screwed to the door. The retainer can corrode or bend; the seal inside it is replaceable on its own.
- Side and top weatherstripping (jamb seal): A flexible vinyl flap on a wood or PVC mounting strip nailed to the door jamb. It hugs the face of the door panels to block side and top gaps.
- Threshold seal: A wider rubber strip bonded to the garage floor (rather than the door). Useful on sloped or uneven Sacramento driveways and for keeping out heavy rain runoff and fine dust.
- Panel/section weatherstripping: Thin seals between the horizontal door sections that block light and air between panels, common on older sectional doors.
How to Tell Your Weatherstripping Needs Replacing
Weatherstripping rarely fails all at once. It degrades gradually, so the warning signs are easy to miss until a heat wave or a winter storm makes them obvious. Sacramento's climate is especially hard on seals: long stretches of intense UV and 100-plus-degree afternoons make rubber brittle, while the damp Delta and Tule fog seasons swell and stiffen worn material. A seal that looked fine in spring can be cracked by late summer.
Do a quick inspection from inside the closed garage in the daytime with the lights off. Daylight leaking in around the edges or under the door is the clearest sign a seal has lost its grip. Then run your hand along the bottom rubber: if it feels hard, chalky, or cracked rather than soft and pliable, it's no longer sealing even where it still looks intact.
- Visible daylight under or around the closed door, especially in the corners where bottom and side seals meet.
- Water tracking across the garage floor after rain, or pooling just inside the door line.
- The garage runs noticeably hotter in summer or colder in winter, and adjoining rooms are harder to keep comfortable.
- Dust, leaves, and grit collecting just inside the threshold, or evidence of rodents, spiders, and other pests getting in.
- Bottom rubber that is cracked, brittle, flattened, torn, or hanging loose from its retainer.
- Side or top vinyl flaps that have curled, split, pulled away from the jamb, or no longer touch the door face.
- Louder operation or a draft you can feel when standing near the closed door.
Choosing the Right Seal: Material, Profile, and Sizing
Replacing weatherstripping goes wrong most often because of the wrong size or profile, not because the work is hard. Bottom seals in particular come in several shapes that are not interchangeable, and the retainer on your door dictates which one will actually slide in and lock. Buying a generic strip without matching it to your door is the most common DIY misstep we see.
Material matters too. EPDM and high-grade rubber stay flexible across Sacramento's wide temperature swing far better than cheap vinyl, which can go brittle in summer sun and stiff in cold fog. For the bottom seal, look for UV-resistant rubber rated to handle both heat and cold; for side and top seals, a quality vinyl flap on a wood or composite mount holds up well since it's less exposed to direct ground heat and standing water.
Sizing comes down to three measurements: the width of the door, the profile of the retainer (single-channel T-style, double-channel, or a U/bead style for doors without a retainer), and the height of the gap the seal must bridge. Uneven or sloped slabs, common on older Sacramento driveways and homes that have settled, may call for a taller bottom seal or a separate threshold seal to close an inconsistent gap along the door's length.
- Door width: Measure the full width and buy a little extra; bottom seals are trimmed to fit, never stretched.
- Retainer profile: Identify single-channel (T-end), double-channel (two beads), or no retainer (U/bead seal stapled to a wood-edged door) before buying.
- Gap height: Larger or uneven gaps need a taller seal or a floor-mounted threshold to fully close the line.
- Material grade: Prioritize UV-resistant EPDM/rubber for the bottom; quality vinyl flap for side and top jamb seals.
- Door type: Wood doors typically use nail-on U-seals; steel and aluminum doors usually use a retainer-channel seal.
DIY Replacement vs. Calling a Mobile Pro
Plenty of weatherstripping jobs are within reach of a handy homeowner. Side and top jamb seals are often the friendliest project: you pry off the old wood or PVC strip, cut new vinyl-edged stripping to length, and nail it back so the flap just kisses the closed door. A retainer-channel bottom seal can also be a doable swap if the retainer is in good shape, the door is fully down and disconnected from the opener for safety, and you have a second set of hands to feed the new rubber through the channel with a little soapy water as lubricant.
Where homeowners get stuck is when the job isn't really just a seal. A bent or corroded retainer, a door that no longer closes evenly across an uneven slab, rust at the bottom section, or panels that have shifted out of alignment all mean a new seal alone won't solve the leak. On older wood doors, the staple-on U-seal can also be fussy to get straight. And anything involving the door's springs, cables, or bottom brackets is genuinely dangerous, those are under high tension and are not a DIY zone.
Because we're a mobile operation, we come to your driveway in Land Park, Elk Grove, Roseville, Folsom, Natomas, or anywhere across the Sacramento area, assess the whole door, and replace the correct seal in one visit, often spotting the alignment or retainer issue that was the real cause of the draft. If you've already tried a seal and the gap is still there, that's usually the sign it's time for a professional look. You can call or request a free quote and we'll bring the right profile and material to your home.
- Good DIY candidates: side/top jamb vinyl, a straightforward retainer-channel bottom seal swap on a sound door.
- Call a pro when: the retainer is bent or rusted, the door closes unevenly, panels are misaligned, or the gap persists after a seal change.
- Never DIY: anything touching the springs, cables, or bottom brackets, these are high-tension parts.
- Mobile advantage: a we-come-to-you visit diagnoses the real cause and brings the matching seal in one trip, no guesswork at the hardware store.
What Bottom Seal and Weatherstripping Replacement Typically Costs
Weatherstripping is one of the most affordable garage door repairs, which is part of what makes it such a good value: a small spend restores comfort, keeps out water and pests, and helps your garage hold temperature through Sacramento's extremes. The figures below are general industry ranges to help you set expectations, not a quote. Your actual price depends on door size, seal type, whether the retainer also needs replacing, and the condition of the door.
As a rough guide, the materials for a bottom seal or a set of jamb weatherstripping are relatively inexpensive on their own; the main variables in a professional visit are the labor to do it correctly, the quality and profile of the seal, and any related parts like a new aluminum retainer or a floor threshold for an uneven slab. Bundling a seal replacement with a tune-up or another repair you already need is often the most economical route, since you're already paying for the visit.
- Bottom seal (astragal) replacement: a modest, low-cost repair in most cases; materials are inexpensive, with cost driven mainly by labor and seal quality.
- Side and top jamb weatherstripping: typically a comparable low-to-moderate range, depending on door size and material grade.
- New bottom retainer + seal: adds parts cost when the aluminum channel is bent or corroded and must be replaced too.
- Floor threshold seal: an additional option for uneven or sloped Sacramento driveways where the door alone can't close the gap.
- Best value: pairing a seal job with a maintenance tune-up or another needed repair so one mobile visit covers more.
Making New Seals Last in the Sacramento Climate
A new seal is only as good as the conditions it lives in, and Sacramento's climate is demanding. The combination of intense summer UV, heat radiating off concrete driveways, and seasonal damp from Valley fog and winter rain is exactly what wears rubber down. A few simple habits stretch the life of fresh weatherstripping considerably and keep your garage sealed year-round.
Keep the slab where the bottom seal lands clean and free of grit, since trapped debris abrades the rubber every time the door closes. A light wipe of the seals and a non-petroleum lubricant once or twice a year keeps the rubber supple and prevents it from sticking to the floor on cold fog mornings. And whenever you have the door serviced, ask for a quick check of the seals so a small crack gets caught before it becomes a leak.
- Sweep and rinse the threshold area so grit doesn't grind into the bottom seal on every cycle.
- Apply a silicone or non-petroleum lubricant to seals once or twice a year; avoid petroleum products that degrade rubber.
- Choose UV-resistant material up front, it's the single biggest factor in how long a bottom seal survives Sacramento summers.
- Add a floor threshold seal on sloped or settled driveways to take pressure off the door's bottom seal.
- Have your seals inspected during any tune-up or repair visit so minor wear is addressed before it lets in heat, water, or pests.